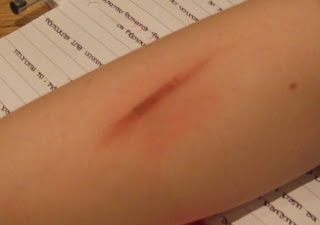
I did some bruise and cut make up tests before the shoot to familiarise myself with the techniques and choose a 'pattern' for the injury.
I used fairly cheap face paint which blended really well. I learnt a lot from the practise particularly that the colours had to be slightly more vivid, than needed in reality, to show up on the camera. (To see the research, click here.)
I started with a bruise on the arm.
I experimented with layering bruises of different age by having some greeny-yellow colouring at the edge of the injury.
Next I attempted a cut.
This looks more like a graze or abrasion but I felt it worked better for the situation we were filming that these were not open bleeding wounds.
I then practised doing facial bruising eg. a black eye, two grazes and split lip.
I felt that this was effective and somewhat naturalistic and so we decided to use the make up for the shots of our protagonist.
I used fairly cheap face paint which blended really well. I learnt a lot from the practise particularly that the colours had to be slightly more vivid, than needed in reality, to show up on the camera. (To see the research, click here.)
I started with a bruise on the arm.
I experimented with layering bruises of different age by having some greeny-yellow colouring at the edge of the injury.
Next I attempted a cut.
This looks more like a graze or abrasion but I felt it worked better for the situation we were filming that these were not open bleeding wounds.
I then practised doing facial bruising eg. a black eye, two grazes and split lip.


No comments:
Post a Comment